Like most everyone right now – it has been hectic around here with the holiday!
This year I was in charge of our church’s Children’s Christmas program. I found a really cute rendition of the nativity story. It involved narration by the oldest kids – 4th graders, and the parts were played by mostly 1st-3rd graders. A few larger parts – like the angel Gabriel and King Herod were played by the older kids also. The kids did an awesome job and it turned out great.
I hope to do a few posts showing the props and plays made and used for the play.
Our church hasn’t done the nativity for awhile so it involved quite a lot of costumes and props. The only thing I didn’t have to come up with were the 3 angel robes.
It would’ve been much better if I had pictures of the play actually in motion but I don’t have permission to show the kids faces and I was very busy helping kids get dressed and directing traffic so – no pictures. I hope to get the DVD that they take just so I can see what was going on from the perspective of the congregation.
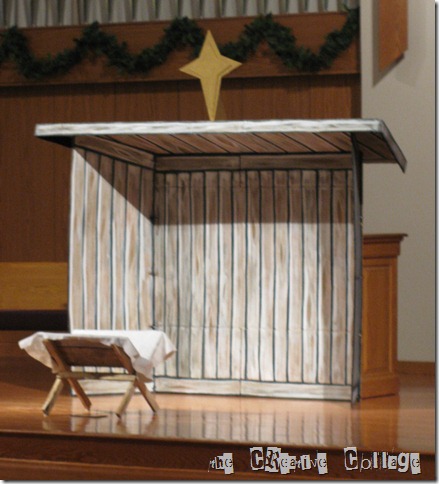
I took this picture at the dress rehearsal before the kids got there.
My husband and I stopped at our local furniture store and picked up some cardboard boxes to make the stable out of. I actually had to glue 2-3 layers together to give it some strength because I needed to use the flaps etc. to make it large enough. I made it using 4 separate pieces. The roof is not attached so that can be lifted off and the sides folded in so that it lays flat as small as possible. I thought I would be able to fit it in our Ford Explorer with the passenger seats folded down –but it was too wide! On to plan B in which my husband and I both had to go to town – one with the Ford Explorer and one with the Ford F250 with the tarp on. The back “wall” is 5’x5’, the side “walls” are 2’ wide with a tapered height – 5.5’ down to 5’ to allow for the slant roof. I used zip strips to connect the sides with the back leaving enough room for the sides to fold in. The roof is 8’ tapered down to 6’ in the back and is 3’ wide. I added a 4” edge around the front and sides. I used zip strips to connect the sides with the back leaving enough room for the sides to fold in.
Painting it – I found a blog that showed how they painted cardboard to look like wood – so I loosely followed that. (Sorry I can’t remember where it was!) Instead of painting it all black to start with as they did, I just measured out every 4” and drew a pencil line which I used to loosely paint black strips over. I then went back with a watered down brown and covered some areas and not others. The white paint I used was also watered down. I dabbed in the mixture, dabbed off on a paper towel and drug it down to look like wood grain, adding knots randomly as I went.
I ended up with a star-on-a-star because the first one I cut was too small. I made a bigger one and then thought I could just as well glue the other one to it! I added a triangular shape to attach it to the star and to the roof. This was tied on with twist ties so I can take that off and store it separately also. I just used craft paint to paint the star.
This was quite a labor intensive project, but very inexpensive. I was pleased with how it turned out and it held up through the dress rehearsal and the service of the play.


Thank you for posting this. I will attempt to build the stable as you did. I’m curious about how to do the manger which looks more difficult.
where did you find your christmas play? I am looking for something that is simple.
I would also like to know where you found your simple nativity play
What size boxes did you use to start out with???